Tasty Trucks!

Good morning!

I hope that everyone has a wonderful weekend! Ours was great, though not near long enough, as usual!

I will be busy getting ready for Thanksgiving this week, we are hosting it at our house. Lots of family coming by 🙂 I can’t wait!

My husband on the other hand? He is a massive Black Friday shopper. Me? Not so much! But he organizes a plan of attack and is VERY serious with his shopping!!! We even spent part of Sunday going to a few stores that advertised their Black Friday ads already, to see a few things in person to decide if he really needed whatever they were advertising lol How about you? Do you view Black Friday as a holiday in itself as he does? Or could you leave it?

Saturday I got out one of our Sale-A-Bration sets that will be available FREE with a $50 purchase, starting January 4th. I just love this set, so much fun!

20161108_194859

This card came together SO easily!!!!!

20161118_210041.jpg

Sorry that it seems all wonky! It is actually perfectly straight, in face I pulled off the truck panel twice to realign it lol

The truck was colored with Melon Mambo and Bermuda Bay. I squished the ink pad into the lid, then picked up color from the lid using my Aqua Painter. I have started keeping 91% alcohol in my aqua painters for coloring this way. Alcohol dries so much quicker than water, and your cardstock doesn’t pill as it does with water. So much easier in my book!

I ran a strip of Melon Mambo cardstock down the left side, then a piece of the striped Bermuda Bay DSP (from the Bright Designer Series Paper Stack… a staple for me!) was adhered on to using Dimemsionals.

The Melon Mambo and Basic Black Bakers Twine is sadly retired, but I love it on this card and thought that it was perfect.

The panel with the truck is also on Dimensionals. I love using Dimensionals, it adds the perfect something-something!

If you have any questions, please let me know!

Don’t forget that today starts the Online Extravaganza! In case you missed it, read more about it HERE!

Have a great day!!!

Online Extravaganza!

Good morning and happiest of Friday’s!

I am SO thankful that the week is almost over. I shouldn’t be wishing my life away like this, but trust me… it has been a nightmare!

Anyway, us demo’s have been sitting on some news for a little bit.

Starting Monday November 21st, through Wednesday November 30th, Stampin’ Up is holding their annual Online Extravaganza!

There are a ton of items, ranging from Enamel Shapes to Stamps to Dies (and everything in between!) that are 10-40% off!

Check the charts below to see all of the awesome items that will be on sale.

Please note though, some of the sales are only good on certain days, so make sure that you check the charts for the details.

If you have any questions or need clarification on anything, please let me know!

online-extravagana-product-list-us-page-001

online-extravagana-product-list-us-page-002

online-extravagana-product-list-us-page-003

online-extravagana-product-list-us-page-004

Lift Me Up!

Good morning!

Over the weekend I finally got to play with my order that arrived last week from OnStage. The first bundle I grabbed?

20161108_194413

This one!

I just love it. It is so much fun, and different from so many other sets out there!

My brother’s birthday was yesterday and I figured that it would be the perfect occasion to put this bundle to use.

20161113_112531.jpg

What do you think?

The DSP is from the upcoming Sale-A-Bration catalog. There is a pack of coordinating DSP in it that you can get for FREE when you spend $50!

20161108_195936

I love the patterns in this one, so much fun!

The clouds on this card were die-cut from the Up & Away Thinlits, then adhered to the card using Dimensionals.

The hot air balloon was adhered using the Foam Adhesive strips. They are about twice the thickness of Dimensionals, so they are perfect for varying heights on your project.

If you have any questions, let me know.

The Occasions & Sale-A-Bration catalogs go live on January 4th! Until then, keep an eye out on my blog as I share more from the catalogs 🙂

Have a great day!

Star of Light- Take 3!

Good morning!

I hope that everyone had an excellent weekend! Mine was good! Saturday morning a few of us went to a Stamp Camp and made some fantastic cards using product from the Stampin’ Up Holiday and Annual catalogs. We always have a great time there. I will share the cards later in the week with you all. Lots of great ideas!

Saturday evening my mom came over and we stamped for a bit. So nice to have crafty time with her!

Sunday we took the dog to the park. Do you have dog parks around you? Opie LOVES going to the park. He plays with other dogs, runs like crazy, and gets worn out lol This was yesterday when we decided to sit down for a few minutes before heading back out on the paths.

20161113_143318.jpg

Last night I made lasagna for dinner and my wonderful in-laws came over. We always have a good time with them 🙂

Anyway! Onto today’s card! This is the final card that was made in the Christmas Card class from 2 weeks ago.

20161107_080746.jpg

So pretty! I have said it numerous times before… this bundle is my favorite in our Holiday Catalog!

Like the others, it looks complicated, but it is really easy!

  • Trim a piece of Night of Navy cardstock to form a top folding A2 card.
  • Trim another piece of Night of Navy cardstock to 4 x 5.25 inches.
  • Rub your embossing buddy over the whole piece of cardstock
  • Using Versamark, stamp your sentiment at the top of the panel
  • Again, using Versamark, stamp your large swirl in the center of the bottom 2/3 of the panel.
  • Finally, using Versamark, stamp various stars around the panel, in a random pattern using 2 or 3 of the small stars.
  • Sprinkle Gold Embossing Powder over the whole thing and heat emboss it.
  • Set the panel aside.
  • Using the large star outline, die cut it from Gold Glimmer Paper
  • Using the large detail star, die cut it from Night of Navy cardstock.
  • Adhere the large detail star to the top of the star outline.
  • Adhere the star to the Night of Navy Panel.
  • Adhere a small strip of Gold Glimmer paper to the left side of the panel.
  • Using dimensionals, adhere the completed panel to the front of your A2 card.

That is it! 🙂

I hope you enjoyed today’s card, it was so much fun to make.

I will be back on Wednesday with a birthday card made for one of my favorite people, using a brand new bundle from the Occasions catalog!

Have a great day!

Star of Light take 2!

Good morning!

So what did you think of the goodies that I shared from my recent order? Great stuff right?!?! And wait until you see the rest of it!

As promised, here is the 2nd card my class made in my recent Christmas card class.

Again, we used the Star of Light bundle for this one.

143508g

This card is SO pretty and delicate!

20161107_080701.jpg

(The card is NOT cut crooked, it is my stellar photography skills at work here lol)

Black and silver pair together beautifully don’t they?

To create this card:

  • Cut and fold a piece of Basic Black cardstock to form an A2 card.
  • Trim a piece of Silver Glimmer cardstock to 5.25 x 4 inches
  • Adhere it to the front of your card.
  • Trim a piece of Whisper White cardstock to 3.5 x 5 inches and adhere it to the center of the Silver Glimmer cardstock. This will serve as the background for your top layer.
  • Trim a piece of Whisper White cardstock to 3.75 x 5.25 inches.
  • Die cut the large star outline out of it, aprox 2/3 of the way up.
  • Stamp your sentiment onto the bottom of the panel, using Basic Grey cardstock
  • Die cut the small ornate star from a piece of Silver Glimmer cardstock.
  • Using Dimensionals, adhere the top layer onto your card, allowing some silver to peek out of the sides.
  • Carefully adhere the silver star onto the background piece of Whisper White cardstock, centering it in the opening of the top panel.
  • Place a large rhinestone in the center of the star.

You’re done!

I will be back Monday with the third and final card from this class.

Have a wonderful weekend everyone!

Occasions & Sale-A-Bration Sneak Peeks!

Good morning!

Well, how are you feeling about the news of our new President Elect? Many are thrilled, many are very much not thrilled. I will keep my own feelings out of it. But it is truly a new time in our country! I am curious to see how things are going in a year or two.

Anyway! Yesterday I received my order from OnStage. Those that attend get to order from a small grouping of new products, that is one of the benefit to attending! I ordered everything, with the exception of one suite that I didn’t care for. In addition, we got to earn Sale-A-Bration products!

My husband looked in my box while I was making dinner last night… his eyes kind of bugged out lol

Want to see?

20161108_194413.jpg

How fun!!!!!! The samples made with this bundle are just amazing and I can’t wait to play with it (this weekend!).

20161108_195936.jpg

This is the Carried Away DSP. It is a Sale-A-Bration item! So for every $50 (US) you spend, you can get this (or so many other items!) free!

20161108_194526.jpg

This is such a neat bundle! See the dies? 2 of them make little envelopes, 2 others made tiny cards to fit in the envelopes, the hearts running down the side? That is an Edgelit. You use that on the edge of your card or project and end up with 3D hearts! FUN! (Hint: See the die between the two arrows, the square shape with the squiggly outline? That is used with a different stamp set also!). The stamps here are perfect for Valentine’s Day. Lots of love!!

20161108_194740

There are 2 Valentine’s Day bundles in the new Occasions catalog. This Suite is my very favorite. The stamp set is extremely versatile, and those dies? I am so in love with them! (See what I did there?). Two of the dies, on the right, make beautiful belly bands for your cards or projects. The one on the left makes a beautifully delicate gate fold!

20161108_195625.jpg

This is the coordinating paper with the above  Suite, Falling in Love DSP. It is BEAUTIFUL! So soft and airy.

Also included are these pretty & delicate glassine sheets. These would make fantastic gift bags, overlays on cards and so much more! They are printed with tiny hearts, but honestly? It is hard to tell that they are hearts unless you reallllly look, which makes these great for other occasions as well! Each sheet is 6 x 12 inches and you get 10 in a pack.

As well, this suite includes these fun wooden hearts, all sorts of sizes and styles! There are also these pretty Very Vanilla flowers with rhinestone centers. These will add the perfect amount of bling! (Not pictured- Very Vanilla 1/4 in satin ribbon!)

20161108_194634.jpg

Dragonflies!!!!! I think everyone in the conference center gasped when they saw these. Love love love them! And see that fat, little bumblebee? There is a die for that as well!

20161108_194821.jpg

One of our new hostess sets- Thankful Life. Now, it is hard to tell what you do with this, but it is a 2 (or 3!) Step Stamp. Each of the flower stamps has a tab at the top. You stamp your first one, making note of where the tab is. Ink up your 2nd one and stamp it the tab matches up with the first one. If desired, ink up the third one and stamp it as you did with the second one. Sounds complicated, but SO easy!

20161108_204103.jpg

This was just a quickie I did last night to play, but it gives you a good idea of what it looks like when all 3 are stamped. I stamped the vase with Versamark, then heat embossed it with gold embossing powder.

Onto Sale-A-Bration!

You got a peek at one of the paper packs above that are available, but below are a few stamps sets that are as well!

20161108_194834.jpg

This is my very favorite one! It makes me smile!

20161108_194846.jpg

How pretty are these? I can’t wait to use them, just a peek of lace from under an image will be beautiful!

20161108_194908.jpg

I love a good Thank You stamp set, this is right up my alley!

20161108_194859.jpg

Finally, the awesome Tasty Trucks! This set is total fun. Food trucks are so *in* right now so this fits perfectly.

So, what do you think? Did I get you excited for the new Occasions and Sale-A-Bration catalogs? Wait until December when you can see the catalogs in full! You are going to love them!

If you would like to be on my list to get a catalog, make sure you email me at InkItAll@yahoo.com to let me know!

Have a great day!


Star of Light!

Good morning!

Hopefully by now you have checked out some of the goodies that I was able to share from our OnStage event and the upcoming Occasions and Sale-A-Bration catalogs that I shared yesterday. If you didn’t see anything you loved, just wait! The catalogs are full of amazing things, something for everyone!

Make sure you check back tomorrow as well, I will be sharing photos of my goodies that I ordered from the new catalog!

Onto Christmas cards!!

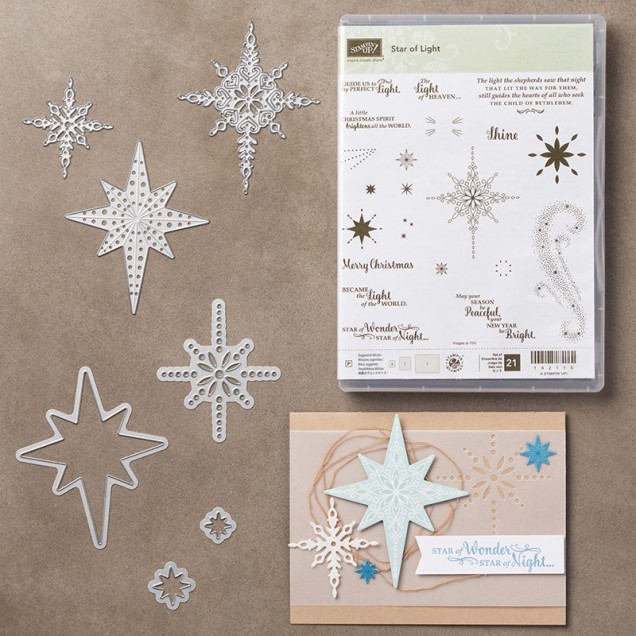
In this months class, we used the Star of Light bundle.

143508G.jpg

This bundle makes it so easy to make impressive cards!

In our class, each attendee made 12 cards, 4 each of 3 different designs.

The first card was my favorite I think.

20161107_080722.jpg

Easy to do multiples of it and so much fun!

  • Cut and fold an A2 card from Real Red cardstock
  • Trim a piece of Whisper White to 5.25 x 4 inches
  • Stamp the start swirl in Smokey Slate Ink in the center of the Whisper White cardstock
  • Stamp each sentiment in the upper left and lower right corners using Basic Grey ink
  • Die cut a solid star from Real Red
  • Die cut the large ornate star from Silver Glimmer cardstock
  • Die cut the smallest ornate star from Whisper White cardstock
  • Adhere your stars together, largest on the bottom, smallest on the top
  • Adhere star to the center of your Whisper White panel
  • Adhere the Whisper White panel to the front of your Real Red A2 card

That is it!

I just love the look of the red and silver together!

Have a great day!


OnStage! Occasions Catalog! Sale-A-Bration!

Good afternoon!!!

Wow, do I have a LOT to share with you today!

As you heard if you read my blog last week, this weekend I was in Kansas City to attend OnStage. Wow I had an amazing time! SERIOUSLY AMAZING!

I met some wonderful people. What is it about stampers? Every single one is so kind and gracious. Since I was traveling to Kansas City for this OnStage and not to Madison with the rest of the my Stampin’ Up friends, I was going to be on my own. But no worries! I posted on a demonstrator message board, looking for other loners, and we ended up having a full table. Again, so much fun!

Each of the tables were decorated with a cute hot air balloon, as well as the ribbon stating that this time was to Celebrate YOU!

20161105_075126.jpg

We always get the opportunity to play with new stamps and items. The stamps were neatly stacked next to a box warning us not to open it until we were told to!

20161105_075137.jpg

See the dragonfly stamps to the left?? Love! The OnStage binder on the right was one of the goodies that were given to each attendee. It is a wonderful date book and planner, with room to draw out card ideas, jot down notes and thoughts, and more. Trust me, they spoil us!

The new catalog that will be live in January? Oh wow, you won’t be disappointed at all! There is a little something for everyone. We know that Stampin’ Up listens to us. How do we know? Well one huge way is that many customers and demonstrators alike were disappointed with the last Occasions catalog. Not in the catalog exactly, but that there were no Easter stamp sets. This catalog? There are THREE. One with the most adorable eater basket that you can fill with many things, including a cute floppy bunny, and also a chocolate bunny! SO CUTE!

Oh! There is a set with a gummy bear in it! It is a 3 step stamp that is going to make the most fun little gummy bears! Another set with monsters that you won’t mind finding under your bed at night.

There is a beautiful carnival set (wait until you see the coordinating DSP!), hot air balloons, dragonflies that I gave you a peek of above (with stunning thinlits/framelits!), Mediterranean scenes that will work perfectly with our new Watercolor Pencils!

There are a few sets for the men in our lives as well. Perfect for birthday’s, father’s days, just because, and more.

As usual Stampin’ Up has done a beautiful job with Valentine’s Day. There is one very traditional suite with the cutest thinlits (and an edgelit to die for!), and another suite that is so dreamy, soft, and beautiful.

Now, I am sure that you are sick of reading about what is in the catalog and want to SEE what is in the catalog? Now, I can’t show you inside of it quite yet, but here is the outside of the Occasions catalog as well as the Sale-A-Bration catalog!

20161107_080609.jpg

You will notice that Stampin’ Up is on trend once again with the Succulents on the cover. Not only are they on the cover, but there are a few stamp sets with beautiful succulent stamps (and dies!).

The Sale-A-Bration items are so much fun this year! Great stamp sets, DSP, DSP coloring pages! See the gold/white striped tin on the cover? That is a Sale-A-Bration item as well!

Want to see one of the succulent stamp sets?

20161107_080501.jpg

They don’t look like much, but when stamped and colored, they are amazing! There are coordinating Framelits as well!

Want to see two more sets?

20161107_080448

This one has some FUN dies that coordinate with it for some fantastic Birthday cards 🙂

20161107_080511

How fun is this one? You ever “draw” in the air with a sparkler? That is what this set is going for. I can’t wait to use it with metallic embossing power on black cardstock!

Finally… I have a card to share with you. I wanted to play with a new set SO bad this morning before work but didn’t have a ton of time…

20161107_090058.jpg

Kind of a hot mess, but I love it! 🙂

I have an order from OnStage that I placed on Saturday that will be here tomorrow! I will take pictures of it all and share it with you on Wednesday, so look for that. Tomorrow I will share the first card from my last card class with you. Lots of fun this week!

Have a great afternoon!!!


Stitched Framelits!!

Good morning!

I am on my way to OnStage today, but I wanted to share a few things with you!

Did you guys see my post last week where I mentioned the NEW framelits?? I am so excited about these and can not wait to get them in my hot little hands!

They are available now!!!!

Stitched Shapes available now.jpg

You get 12 Framelits, 4 of various sizes in 3 different shapes, for $30.00.

In addition, in the month of November ONLY, the following coordinating stamp sets are 25% off!

sale-priced-stamp-sets-november-2016r

All of these sets have stamps that fit perfectly into the new Stitched Thinlits.

To order the Stitched Thinlits, either contact me or you can place your order directly through the Stampin’ Up website HERE. <— That link will take you directly to the Stitched Thinlits 🙂

Stampin’ Up shared a few videos about these new Thinlits you might enjoy (I did!!)


I will see you back early next week with details from OnStage and the cards from my recent class.

Have a great weekend!!!!!

Vertical Greetings!

Good afternoon and happy Hump Day!

This week is flying by!!!! I don’t know if you have heard, but the Cubs are in the World Series! SO exciting!!!! So my husband and I have spent our evenings cheering them on. Did you see last night’s game? WHOA! Addison Russell… that kid blows me away. 22 years old, in the World Series, playing like he does… it just boggles my mind.

Anyway! I haven’t had much time this week to play unfortunately. I had a class to prepare for (and will be sharing the cards we made in a few days), as well as taking care of a sick hubby. But I did manage to squeeze in some fun time and came up with a card that I am loving!

I purchased the Vertical Greetings stamp set with my first order from the Annual Catalog, but only recently got it out.

141876G.jpg

Such a sweet, simple set to create quick cards. Seems quick cards are my favorite lately!

I paired it with the (also new) Diagonal Stripe background

141917G.jpg

This stamp is SO versatile and I can’t wait to play more with it!

For now, this is what I came up with…

20161027_172001.jpg

(These pictures are crummy… I apologize for that! I need to invest in a good background and lightbox I am thinking!)

The card base is the standard A2 card from Whisper White cardstock. I then trimmed the top part of the card to only be 3 and a half inches wide. That leaves .75 inches exposed of the inside of the card.

Happy Birthday was stamped on the inside of the card so that you can see it while the card is closed.

The striped were stamped onto a piece of Cherry Cobbler cardstock using Versamark, then heat embossed with Clear Stampin’ Emboss Powder. I love the look! I trimmed a piece down to 1 inch x 5.25 inches.

The image was stamped onto a piece of Whisper White cardstock that was trimmed to 2.75 inches x 5.25 inches. To get multiple colors onto one image, I used a few of our sponge daubers. I dabbed a dauber into Soft Suede, then onto the rubber directly, making sure to dab the ink onto the branches. I did get a bit of ink onto the leaves, I just used a clean papertowel and wiped it off. I switched daubers, then repeated the process with Pear Pizzazz onto the leaves of the topiary.

I did the same with Garden Green ink (using the same dauber since it is in the same color family and I was going light to dark.). With this color, I didn’t completely cover the leaves. I wanted some variegation  of color, so I just dabbed and bit here and there.

I finally did the same with Cherry Cobbler ink onto the topiary stand. The ink should still be wet enough if you worked quickly to just directly stamp it onto your cardstock. Just in case though, I always “huff” onto the rubber. Just breath out through your mouth with your stamp an inch or so away from your mouth. The humidity from your breath is just enough to rewet the ink so you can stamp it.

20161027_171946.jpg

The striped Cherry Cobbler piece was adhered to the card front, leaving a .25″ border between the right side and the edge.

I wrapped a piece of Cherry Cobbler Thick Bakers Twine around the Whisper White panel three times, knotting it behind the image so it won’t be seen.

The panel was then adhered to the front of the card, using Dimensionals.

I am so happy with how it came out!

One more quick view of the card when it is open….

20161027_172050.jpg

This will be put in the mail tomorrow for a special friends birthday next week 🙂

The weekend will be quiet around here. My husband and I are leaving for Kansas City, MO on Friday. I can not wait!!! The Stampin’ Up OnStage event is this weekend. There are events all over the world this weekend, hosted by Stampin’ Up. There is one semi close to me in Wisconsin, and that would have been ideal. Unfortunately it filled up before I was able to register.

My husband and I enjoy road trips though, so we decided to pack it up and drive to the Kansas City OnStage 🙂 It will be not only a fun weekend with him, but I will get to see the brand new Occasions Catalog (that will go live Jan, 4th, 2017!) as well as the Sell-A-Bration catalog! So much to look forward to!

And the best part??? I will get to share it all with YOU! Nov.7th at 1pm MT the “gag” is lifted and I can tell you all about the goodies, what I learned, what I saw, etc. I will not be able to share the actual catalog with you until January 7th, 2017 though. 😦

So look for a great post Monday!

Have a wonderful rest of your day!

T