Foxy Friends

Good morning!

I hope that everyone’s week has gone well.

We are finally in the perfect fall weather… highs in the 60s every day, lows in the 50s. Perfect for me!

I know yesterday I said that I would be sharing a few cards today from my recent Christmas Card class, but due to operator error, that won’t be happening today. Look for them next week instead.

Last night I just wanted to play, didn’t have anything in mind, no special occasion, no class.

I pulled out the Foxy Friends bundle that I just received.

Foxy Friends.jpg

I don’t know why it took me so long to order this bundle. It is CUTE! And the things that can be done with it are amazing!

Do me a favor, go to Pinterest, at the top type in Stampin Up Foxy Friends then hit enter. Go ahead, I will wait 😉  CUTE CUTE CUTE ideas!!!!!!

I didn’t want to do anything to involved last night. I didn’t have a lot of time, but needed a bit of a mental break. This is what I came up with…

20160929_200412

Totally simple, not my best showing, but the little fox family sticking their heads out of their tree holes make me smile!

This card came together quickly. I stamped a piece of our Kraft cardstock with Early Espresso ink using the Hardwood background stamp and heat embossed it with clear embossing powder.

I stamped the cute little fox heads onto Whisper White cardstock using Calypso Coral ink and punched them out.

Their bodies were stamped onto scraps of Whisper White, then die cut using the awesome Layering Circles Framlits. The frames around the circles were also die cut using the same set, out of Early Espresso cardstock.

The Hello sentiment is from the extremely versatile Thoughtful Banners stamp set. Honestly I was looking for a stamp that said Peek-A-Boo or something 😉 The sentiment was stamped onto Whisper White cardstock, then punched out using the (retired) Washi Tape punch. I trimmed the sides a bit to make it more narrow, then adhered it to a piece of Early Espresso also punched out with the Washi Tape punch.

Then I just adhered it all together! Everything is adhered down with liquid glue, except for the heads of the Foxes. I put those on dimensionals to help with the illusion that they are popping their heads out.

Fun right? I can’t wait to really play with this bundle, including the coordinating A Little Foxy DSP!

Have a wonderful weekend!

Moving Notebooks in Evernote


Good morning!

This is just a quickie regarding Evernote. I had someone mention that they weren’t sure how to move notes between Notebooks in Evernote. You will need to do this if you placed your new Note into the wrong Notebook, if you created new Notebooks and need to rearrange your notes, etc.

It is easy to place a Note into the wrong Notebook, but thankfully it is SO easy to correct that!

Open Evernote

  • Open the item that you want to move to a different notebook.
  • You will see this:

11-move-note

Click on the icon that is circled above.


1 Move Note.jpg


You will see that it says “Move Note” when you hover over it.


1 Move Note 2.jpg

This will show you all of your notebooks, plus allow you to create new ones. Whichever notebook your note is currently in will show up in green with the green check next to it.

1 Move Note 3.jpg

Click on whichever notebook you want your note moved to.


1 Move Note 4.jpg

That is it! You will know you are successful when you see the green bar pop up at the top of the screen saying that your note was moved. You will also see that the Notebook it is in has changed (circled).

When entering new Notes, just keep an eye on that spot above that is circled. You can switch Notebooks around just by clicking there.

If you have any other questions, let me know!

I will be back tomorrow with two cards from a recent Christmas Card class I hosted.

Have a great day!

Ever feel like this? And my story…

Good morning! I hope that you all had a wonderful weekend!

So, I was unpacking an order over the weekend that I had placed recently. Nothing too special, but it does include a fun stamp set that I have been eyeing from the Annual Catalog 🙂

I saw this recently though and it fits… perfectly!

14355793_10153812086677401_1569181921298751669_n

SO VERY TRUE!

Then I started thinking about when I started stamping. It was years ago. 15+ years at least. Maybe 18 years?

I started as a scrapbooker. I loved paper, any kind of paper. My son was around 2 and I decided it would be fun. And it was!! I loved it!

Stamping wasn’t too big at that point. Some of the big box stores carried wood mount stamps and inks, but not a huge selection that I recall.

I was on a scrapbook group, think it was through Yahoo Groups (is that still around?). They did a wish list kinda thing. One person would add their name to the Wish List, with something they wanted. Someone who had that item (no purchasing anything allowed) would fulfill their wish. Then they got to add their name to the list.

Anyway, I fulfilled someones wish, and added my wish… I wanted a heat gun. I had a few stamps, one or two inks, and one clear embossing powder. I was using my toaster to melt the ep. Seriously. I heard it could be done. And it worked! I don’t suggest you try that if you can avoid it though 😉

The box I got was amazing. A heat gun, a bunch of stamps, and so many different embossing powders. I was hooked.

The next weekend was a Scrapbook Expo. I spent my entire budget just on blocks and unmounted rubber. I was in heaven! Soon after my scrapbook items grew dusty since I was doing more stamping than anything.

After a while I got good enough to share online. Then I started working for design teams. I loved that so much!!!! Mixed media was my favorite.

I kept going for about 8 years, then my muse took off on me. I tried playing for a while, but it just wasn’t happening. I took a very long break, then started playing again a few years ago. I was completely amazed at how far the industry had come in the 5 or so years I wasn’t crafting! My style has completely changed, the brands that I once loved I don’t look at twice anymore.

I found my home with Stampin’ Up and I am so happy! I get to stamp and play to my hearts content, and share that with others. It makes my heart happy when I can teach someone something new or share tips or tricks with those new to stamping. Even better when I can help someone who has never put rubber to ink catch the same bug I have!!

So that is my story! What is yours? What got you into stamping?

Blessed

Good morning and happy Friday!

I hope that everyone has had a great week so far and have fun plans for the weekend. Not sure what my husband and I will be doing yet. I am thinking a trip to the movies will be involved though. We both want to see Sully and have heard excellent things about it. Have you seen it yet?

One thing is for sure though, I will be spending LOTS of time down in my craft room preparing for a class I am holding on Monday. I am doing 3 Christmas Card classes, one in Sept, one in Oct, and the final one being in November. Each class we will be using mainly one bundle and making 12 cards (4 each of 3 different designs). This month we are using the Santa’s Sleigh bundle. I can’t wait, this should be a good time 🙂 But whoa… the amount of preparation I need to do is crazy lol Hopefully by the time the next class rolls around I will have a system in place 🙂

Anyway!

The final card from class this past Sunday seemed to be a favorite for a few.

20160918_192303

Totally simple, but looks impressive. (and is NOT crooked in person, I promise!)

I actually did two different versions before deciding on while one we would be doing in class.

This was the first version.

20160918_192251

Pretty, yes. But I am much happier with how the class version came out.

What do you think?

20160918_192314.jpg

On both of them, the adorable flower was colored with Rich Razzleberry and Delightful Dijon ink using a blender pen. A bit of Clear Wink of Stella adds a bit of shine to the flowers.

Have a great day!!

Product List

Blender Pens

$10.00

September Paper Pumpkin

Whoa… I LOVE this months Paper Pumpkin!

It is in the top 3 for me of all of the kits I have received so far.

If you haven’t seen it yet, take a look below…


I will be ordering a refill kit for sure! A demonstrator friend gave me one cute little vial this past weekend at a Stamp Camp I went to. She found the cutest Halloween Tic-Tacs to put in them. Some had tiny witches, some had pumpkins. Adorable!

This is good time to remind you all of the current promotion for Paper Pumpkin

pp_bogo_demo-header

Buy one month, get the next month free!

This promotion goes through Oct 10th, so you have a few weeks to make up your minds yet. But I promise you, you won’t be disappointed! Two Paper Pumpkins for $19.95? Nice!

You can read more about the promotion HERE.

If you are on the fence, I can understand it. It is hard to dish out $20 a month when you aren’t sure what you will be receiving. But when it is $10 a month, that makes it a bit easier right?

If you want to take a peek at past kits to get an idea, check out their YouTube channel HERE. They post quick videos every month to show the great boxes.

If you have any questions, let me know!
Have a great day!


Merry Christmas Wishes

Good morning!

I just wanted to take a moment and share with you one of the cards that was made at the class I had this past Sunday.

20160918_192233.jpg

I flippin’ love these reindeer!!!! They were stamped onto watercolor paper, then punched out. We then very lightly went over them with Crumb Cake ink and an aqua painter. Gives just a bit of color so they aren’t stark white. A touch of Pink Pirouette inside the ears and on the cheeks for a bit of warmth and they were good to go!

Rudolph’s nose was stamped in Real Red onto a scrap of watercolor paper, fussy cut, and adhered over the original nose. A bit of Clear Wink of Stella and he was set!

Check out the background. That was made with Stampin’ Up’s new Cable Knit Dynamic Impressions Embossing Folder. It is a THICK folder, but does amazing things. It embosses and debosses (spell check says this isn’t a word, I say it is, so there!), giving so much more texture than the standard embossing folder. Lotsa fun for sure! How neat would it be to make a sweater using this embossing folder? Even better an “ugly sweater” card! lol

Now, I should have taken a photo, but one of the ladies decided to add little eyelashes to the reindeer on either side of Rudolph, and a pretty red bow (from Red Foil!). It was ADORABLE!!!!

One thing that I love about my classes is that the ladies are always free to change up a design so it works best for them, or to add little elements. I get so many ideas from them 🙂 I have such a great group of ladies that I get to play with every month!

Friday I will share with you all another card we made plus a project that we had fun putting together.

Have a great day!!


Product List

Jar of Haunts Treat Holders

Happy Monday!

I hope everyone had an excellent weekend 🙂

I hosted a class at my home yesterday. I wanted a little something to give each of the ladies that came. I had such fun putting these treat holders together!

20160914_191824.jpg

Aren’t they cute! They are the perfect size to hold 2 fun sized candy bars 🙂

All were either stamped into a mason jar from the Jars of Love set, or they were die cut without being put into a jar (in the case of the mummy and the pumpkins). The 4 lids were heat embossed with Copper Stampin’ Emboss Powder.

20160914_191628

The “blood” drips were colored with a Cherry Cobbler Stampin’ Write marker, then I went over it all with the Fine Tip Glue Pen. Did you know that you can use it in place of Glossy Accents??

20160914_191747

This adorable pumpkin first had its background stamped with the Woodgrain background stamp using Versamark (remember, you don’t need to heat emboss Versamark! It will leave a watermark appearance and the stickiness will go away!). The adorable face was stamped using Basic Black ink, as was that little spider. I just drew a line using my Basic Black Stampin’ Write marker for the spider to hang from.

20160914_191736

I love these creepy eyes!! I used a Real Red inkpad, with a Blender pen to add in the bloodshot eyes, then with barely any Real Red on the blender pen I went over each of the eyes, to add to the pink, bloodshot look. Finally, I went over the fluid in the jar as well as the eyes with the Fine Tip Glue Pen again to give a glossy look to it all.

20160914_191717

Not everyone likes the creepy Halloween things that I do. I thought this pumpkin was the perfect thing! I colored it in with Pumpkin Pie ink using my Blender pen. When I was done, I took a piece of a sponge, dabbed it into the ink pad, then onto the pumpkin. It gave more of a variegated look to the pumpkin. Cute right?

20160914_191704

And the mummy… my favorite! How adorable is he??? I added a bit of color to the corners/folds with a Stampin’ Write marker in Smokey Slate. He was so easy to do, and the cutest thing!!!

If you have any questions let me know.

Have a great day!!!

Stamp Inventory- Evernote

Good morning!

Today I don’t have a project to share with you, but instead a way to inventory your stamps! Trust me, preparing this was a project in itself lol

I recently started using Evernote and I am so happy with it! I figured that I would share with you all if you aren’t using it, if you are struggling to find a way to inventory your stamps, if you accidentally order duplicates because you don’t know what you have, etc.

I had numerous ways previously of keeping track of what stamps I had. My most used system was to physically stamp into a blank notebook. I would then flip through to find what I needed. But when you have a bunch of stamps, that system becomes difficult (for me at least). I do know people that still do this, even with hundreds of stamp sets and it works for them. Not for me anymore. I am just sharing what works for me personally.

I am not going to lie, it takes a bit to initially set up, especially if you have a lot of stamps. I only have about 50 in Evernote so far, not going to admit how many I have sitting on my shelves though 😉 I have been adding a bit every day or so and hope to be done next week sometime. (ETA! It is now up to 103 that I have inventoried!!)

Why do I like Evernote? Well, you can use it on your computer, your iPad, your phone. Anytime you want you can open the app and view your stash, add to it, edit, and remove. You can add photos! That comes in handy big time when you are trying to find something in particular.

My favorite thing about Evernote? You can add “tags”. You have a stamp set that is birthday specific. Lets say it has a birthday cake, candles, a present, a few sentiments. You add the tags for each thing in the stamp set (for example, I would create the tags: Birthday, Cake, Candle, present, then whatever the sentiments are). If you add tags for all of your sets, you can search in Evernote for whatever you need. If you search “Birthday”, every set that you stored and tagged with Birthday will appear. That makes it SO easy to find what you are looking for, as well as possibly remind you of something you weren’t thinking of.

As well, the search function comes in handy when you know that you have a sentiment or an image, but you can’t remember what set it is in. Search in Evernote for the tag and there ya go!

First off, you can get it HERE (https://Evernote.com) for your computer. For Apple and Android devices search your play store or iTunes for the Evernote app.

There are a few different versions. Stick with the free one. It supplies you with more than enough space to catalog your stash.

I have a very basic tutorial below on getting you set up, as well as searching. By no means am I an expert in using Evernote, but it is so easy that even I was able to figure it out. There are a LOT of photos below, so grab a cup of coffee, tea, wine, whatever, and enjoy!

For this tutorial, I am explaining how to get started on a computer, NOT an iPad, phone, or other device.

I am not going to explain how to sign up, it is simple… just click the “Try Now” button and follow the on-screen prompts.

When you are signed in, you will be brought to a screen that looks similar to this below:

start

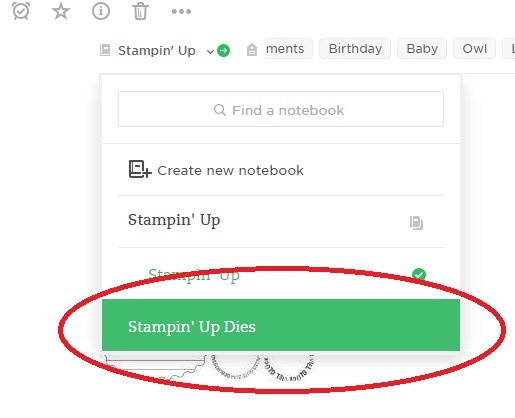
Yours will be empty. Click on the link that is circled above to create a new notebook. I have one for Stampin’ Up stamps, and want another for Stampin’ Up dies.You can have as many notebooks as you would like. Have one for each stamp company, for different types of stamps, for your inks, dies, embossing folders, embellishments, whatever you would like!

When you click the icon to create a new notebook, you will be brought to this screen

new-notebook-1

Start typing to name your new notebook

new-notebook-2

Then click Create Notebook. You will be brought to this screen.

new-notebook-3

Now, I used this just as an example to show you how to create a new notebook. Going forward I will be switching to adding to an existing notebook (which you now have if you followed the directions above).

Click on the Green plus sign that is circled below

2-new-note

You will then type in the title of your stamp set (or dies, or whatever you are entering…). The title will be in the green font. When you are done entering the title, click below and add any notes. I always note if there are coordinating dies, punches, etc.

3-new-note

Adding Photos: If you do not want to add a photo of the stamp set, skip ahead to the section marked “Tags”.

To add photos, create a folder on your desktop to store photos in. Doesn’t matter what you call it, or really where you put it. Just make sure that you know where it is.

Now, I am assuming that you love Stampin’ Up and only use Stampin’ Up 😉 The easiest way to get the photos is to go to http://www.StampinUp.com, click on store, then type in the name of the stamp set you want a photo for in the Search button (on the top right of the page).

That will pull up your stamp set. Click on it. Then Click on the image of the stamp set. That will make it larger.

Right Click on the image, and choose “Save Image”.

1-new-note

Save the image into the folder you just created, with the name of the stamp set as the name of the file.

You can only find current sets on Stampinup.com. If you are trying to find a photo of a retired set, you will need to go to Google.com, type in Stampin Up with the name of the set after it (Example: Stampin Up Vintage Vogue), then click on Images. Search for the image of the stamp set, click on it once, and do the same as above, save it to the folder you created for your images.

*TIP- If you have many stamp sets you want to add to Evernote, I suggest getting all of the photos at one time and saving them all into that folder you made. It will save time later on 🙂

After you have saved your photo, open the folder that you have it in. Open the screen you have Evernote open in. Make it smaller by double clicking the top of the screen, or clicking and dragging the side in. You just want to be able to see the stamp set picture in your folder. (See image below)

Click once and HOLD the photo of the stamp set, and drag it over to Evernote by using your mouse to move it, about to where you see me doing it below. Release the “click” when you get it about where you see it below. If it doesn’t work the first time, try again. It really is easy when you get the hang of it.

2-new-note

And BOOM! Your image is now in the note!

3-new-note

Adding Tags:

As I mentioned above, tags come in handy big time and are one of the reasons that I use Evernote.

You can add whatever tags you want, whatever makes sense to you!

Click on the icon for tags, circled below.

4-new-note

You will then see a little bubble with a plus sign in it. Click on it. You can then type into the bubble. Each “bubble” is one tag. You can see below the tags that I typed for the Paisley & Posies set. When you are done entering one tag, press either tab or enter to be brought to the next one.

5-new-note-tags

When you have finished entering your tags and you are done, click on the green Done button to the top right of the screen.

6-new-note-done

There you go! You have completed your first note!

If you want to delete a tag, just click one on the tag you want to delete then click the backspace button on your keyboard.

One nice thing is that Evernote remembers tags that you have used in the past. For example you have used the tag “Love You” previously. If you start a new tag and start typing “Love”, Evernote will auto suggest any tag that has the word Love in it. If you see one you want to use again, just click on it. If you don’t want to use one from before, finish typing your tag, then click once above it. That will secure your new tag. Clear as mud? 😉

Searching:

Lets say that you have a bunch of notes with a ton of stamps. You want to find a stamp set that has flowers in it. It is easy to do now!

Click on the Search icon, circled below.

1-search


You will be brought to the below screen

2-search


Type Flowers (or whatever you want to find)

3-search


It will then bring up all stamp sets that you have tagged with “Flowers”

4-search

You can see that I have 14 notes that are tagged flowers. It will show a thumbnail of each stamp set, but if I click on the name of each note, it will pull up a larger image along with all of the information and tags for that stamp set.

There is so so so much more you can do with Evernote. This is just to get you started.

If you want to know more or are having trouble with something check this out

Evernote Help & Learning

Feel free to leave me any comments or questions you have and I will do my best to help you out. If you are local, I would be happy to help you get started in person if you need it.

Have a great day!!!!


Special Offers- Sept 15th-Sept 21st

SpecialOffers_Shareable-2_Sept2016_ENG

Good morning!

If you are a Project Lifer, then you will be excited today!

FIVE sets are part of Stampin’ Up’s special offers this week.

Early this year I decided that I was going to start Project Life. I have everything that is listed below already, plus some. And what have I done with it? Nothing. SIGH It isn’t for lack of want! Every month I get a bunch of photos printed out. I label the envelopes the photos come in. All I have to do is get them in the album. Hopefully soon!!!

But what I am most excited about?? The Layering Ovals Framelits! No joke, last night I was thinking how badly I needed these. I took 3 minutes before posting this morning to have those babies sent to me!

Have a wonderful day!!

Just Because!

Good morning!

I received a box of goodies yesterday from Stampin’ Up. Lots of fun stuff to play with. I had things to do in my craft room before I got to play though… like clean! I have a class this coming Sunday as well as the following Monday. My poor craft room was feeling the effects of me being down there by myself for the past few weeks. I tend not to clean up after myself as I should lol Since I have such a large table to work on (check it out HERE if you want to see what my amazing husband built for me!), it is easy to push things aside.

I also forced myself to actually put away everything from my order. That is a struggle, I like to keep the new things out so I can play with them!

When I finally got done, I didn’t have much time but I wanted to play. I pulled out Totally Trees.

142198g

Have you seen this one? So much fun!!!! You can stamp each tree and leave it, or stamp the coordinating solid image over it. There is so much that can be done with this set. I am excited to try all of the possibilities!
For last night, I kept it pretty simple.

20160913_195933.jpg

Since we are just coming into fall and I can’t wait for the leave to change, the cooler weather, sweatshirts and jeans, turning on the fireplace for the first time this year, apple picking, and all that goes with fall, I I decided to do a fall-ish themed card.

The tree was stamped in Soft Suede. Over it I stamped the leaves in Calypso Coral, then stamped again without reinking the stamp. Very easy way of giving some variation to the color and adding some depth.

I did the same with the grass I stamped in Garden Green, stamping it once directly on the paper, and again without reinking.

The image was die cut using our Layering Squares Framelits. I love our new shapes Framelits. They also come with numerous coordinating scalloped edged framelits, making layering so easy. I used on with our new Copper Foil Sheets.

The patterned paper is from the Petals & Paisley Specialty DSP. It is so pretty and I thought worked wonderfully with the fall theme of the card. Again, it is layered with some Copper Foil sheets.

I mounted the image using Foam Adhesive strips. These strips are perfect for things like this! Behind it I would some Copper Metallic Thread.

Here is a close up. You can see it much better in person than through photos.

20160913_200002.jpg

Just Because, from the You’re So Sweet stamp set, was stamped with Soft Suede. I thought that it was perfect and finished off the card exactly as I imagined it.

If you have any questions, as always please feel free to leave a comment or email me at InkItAll@yahoo.com.

Have a great day!

Product List